Saturday, December 8, 2012

Chocolate Peppermint Cookies

its that time of year, when i start researching and looking through all the cookie recipes i've found and loved over the years. this recipe i found about three years ago. they are called 'chocolate peppermint' cookies. they taste just like girl scout thin mints....they are amazing. this recipe requires the cookie be dipped in white chocolate and sprinkled with crushed peppermint candies. i made this batch for a cookie exchange, so to make sure they fit every one's taste, i made white chocolate and dark chocolate cookies. 

presentation is everything!!!!! so of course i made sure to bring my cookies in treat boxes that matched the theme of the cookies i made. i always try them before packaging them up, these of course were delicious!

From Me to 'U'- Fabric Monogram Letters

as a house warming gift for a dear friend of mine, i decided to make them fabric letters, using the monogram of their first names. i chose colors that suited their tastes and color scheme of their new home.

i was deeply honored and humbled to receive a picture from my friends, showing my gift hanging up in their kitchen. it was such a fun project to create and love that it has a special place in their wonderful new home. 

Friday, November 2, 2012

Weddings and Woodgrain


this was a wedding gift for a friend who was having a fall-themed wedding. i was unfortunately not able to attend but i sent along a gift with wrap to match the theme. the wedding invitation had a birch wood pattern on it with the couple's initials 'engraved' into the pattern. so for their wedding gift, i bought woodgrain wrapping paper and hand painted their initials and wedding date on the gift. finishing it off with a tulle bow. 

Wednesday, September 5, 2012

Orange and Brown Mesh Well!

for autumn, i decided to make my first mesh wreath for the front door. i used a mixture of gold, copper, orange and brown. with a few leaves, pumpkins and a large bow, this wreath ended up being very eye catching. 

Sunday, August 26, 2012

Hello Pink Hydrangea Cupcakes

for a ladies get together, i made pink hydrangea buttercream and chocolate cupcakes. there are many shades of pink when it comes to hydrangeas, so i did a few different shades. i also added hints of green for buds.  the cupcakes matched the green and pink hydrangea plates and napkins that were being used for this event. they were arranged on a tiered cupcake holder. 

Saturday, August 18, 2012

Victoria Secret Pink Cake


to go with the victoria secret pink theme of the party, i made a cake to match. i made three layers of chocolate english sponge cake with vanilla buttercream frosting. i then made the neon fondant polka dots to cover the cake, added the zebra pattern ribbon around the bottom to finish it off. not covering the cake in fondant made it a bit easier for those, who don't like it, to remove it and just have the cake and frosting. 

Victoria Secret Pink Party


this party was for a 14 year old girl who loves victoria secret PINK collection, particularly the colours. so after a very productive trip to the shop, i took some notes and began to plan. this was the final product. i had a wide range of colors to work with particularly bright pink, orange, teal, bright yellow and lime green with hints of zebra print. i had some treats available. the birthday girl had braces, so i made sure not to get any candy she couldn't eat.  and instead of hanging a happy birthday sign, i made a cute panty line instead. 

Friday, August 3, 2012

Hello Hydrangea Cupcake Bouquet!

for this gift, i decided to make a cupcake bouquet. the bouquet holds 8-9 cupcakes per flower pot.  for this project, i decided to make chocolate cupcakes in aluminum cupcake holder. 


i chose vanilla buttercream frosting and chose blue and violet hydrangeas. there are other colors for hydrangeas such as apple green and bright bubble gum pink. 

....and volia! my hands ended up a bit blue and purple and i had frosting in my hair...but this was the final product. for this project, i filled in the open spaces with fakes leaves, i can also use colored tissue or paper shreds. i topped it off with a dark blue and light purple bow, safely tucked around the pot. the birthday girl loved it and at first, thought they were real flowers! i would definitely do this again, it got such a great reaction and they tasted delicious! 

Perfectly Plum


as part of birthday gifts, i like to make my own cards. in this case, i came across some pretty floral and shimmer plum/aubergine coloured paper. when i make my own cards, i use a lot of double-sided permanent tape! with this particular card, i used two sheets of 12 x 12 paper and two sheets of 8.5x11 paper. i found some pretty glitter ribbon , that wasn't too messy to work with and the double-sided tape stuck well to it. i always like to line my envelopes. i invested in a envelope liner kit from paper source and it has been the best 13 dollars i have ever spent. i use the templates all the time for card making and designing my own invitations. i try to make my cards fit the personality of the person receiving it. in this case, the birthday girl loves periwinkles and purples...so i picked a very modern floral print, remembering last year i stayed very classic and clean with my design...so this year, i decided to be BOLD!

Thursday, July 26, 2012

Time for the Olympics in London

just made basic chocolate cupcakes...had to make sure i had my special union jack spatula in honor of the summer olympics being held in london, england.


used vanilla buttercream frosting and some fun patriotic sprinkles for the top. i was given a cupcake kit of olympic cupcake papers and picks in honor of the events taking in place in london, home of my family. 

even bought some union jack napkins to serve these delicious treats to my family and friends.

Monday, July 9, 2012

London Party!

planning this london themed get together was tough only because i had never seen it before, at least no prime examples here in the united states. i researched a lot!!! i looked at the jubilee party pictures being posted in england, i looked at 4th of july parties, i looked at parisian parties. it was tough to figure how i could make this look classic and not over done! so i did what i usually do when i can't find what i want...i make it!
i found a light blue table cloth at a local home goods shop. i ended up making a table runner from fabric i ordered from london. it looked very cath kidson, who is one of my favourite designs from there. i went to the flea market to find non-traditional mason jar for vases. in a previous post i mentioned i would post what i used them for....here they are. i used some as vases...tealight holders and photo holders. i bough two dozen red roses and a bunch of tiny roses called 'vivenne' roses for the middle. 

i printed out an iconic picture of queen elizabeth on her coronation day in 1952, it is one of my favorite photographs of the queen. the original is in color, however i changed it to black and white to fit my table layout. closing with the original zinc lid, i added a bow to add some color to the jar. 

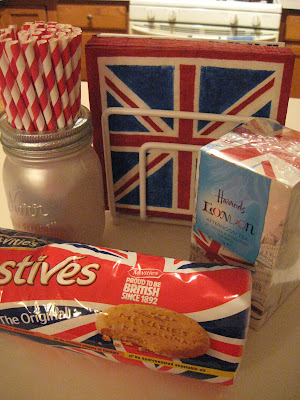
i took of picture of some the items i was setting up. i was able to get some union jack napkins and plates at a store in downtown geneva. i had some one visiting london and had them pick up some harrod's london tea for me. using one of the mason jars i had spray painted pearl with a silver glitter lid rim, i created a paper straw holder. i found these great red and white straws, which looked fun in everyone's drinks. and no party is complete with out some mcvities biscuits, used for dipping in a cuppa tea!


i ended up making my own paper bunting. i found all sorts of red, navy and light blue paper. i even created my own paper triangles by shaded the page light blue and placing a picture of a young queen elizabeth on them. to give them a little something extra, i added a jewel to her crown. i placed the bunting around the counter where the food was going to be served, which lucky enough was cream with navy trim so everything matched perfectly. 

to greet everyone, i had a 'solar queen'. it is a little figure of the queen, whose purse is a solar panel. when she is placed in the sun, she waves. 

London Treat Bags!

to go along with the london tote bags i made, i decided to fill them  with some english goodies. i found these jubilee take out boxes, which i filled with union jack english rock candy. i also found small take out boxes with a large union jack on them...i ended up putting tiny bracelet's in those. 

i went to my local hot spots for these brands of english chocolate candy. i usually prefer english candy to american brand candy. english chocolate is creamier and smoother. using a clear cello bag and some keep calm and carry on ribbon, i added these fun treats to the totes. 


i stopped by world market and found these cute glass tumblers, with black and white images of london on them with a bright red telephone box. i wrapped up the glasses in large sheets of blue and white gingham wax paper, added some red shreds and a bright royal blue ribbon to finish it off. 

London Calling!

time to break out the ol' sewing machine. for a girl's weekend, i decided to make my friends each a tote bag. with the theme of the party already decided as a celebration of london, i went on a search for london/england themed fabric. i ended up finding four different designs from a company just outside of london , one of which i used for a table runner which i will post soon. i found three designs that worked perfectly for making the bag. i didn't use a bought pattern. i looked at other tote bags i had and began to plan and design. 

i was able to make two tote bags per yard. the final cutting measurements were 22 inches across and 19 inches tall. the straps, depending on the length you prefer, were two yards long, each.  it took on average three days to complete each. since i am a bit of a perfectionist when it comes to creating and designing stuff, i was measuring all the time... making sure not to have a crooked seam, a slanted side, odd pattern placement. i also always had an iron on hand to make sure everything was nice and smooth and that the seams turned out nicely, especially when i did the straps, which were the most difficult part to accomplish.  i did add a liner for each bag, to add protection the patterned fabric itself and to add some stability to the bag. 


the final products came out perfectly. i still have yet to make myself one. the girls loved them. i added these craft tags to the bags, so when i handed them out, i knew who got what bag. they are 100% cotton so easily washed on the gently cycle. i was very happy with this project, considering it was the first time i had a used a sewing machine since middle school home econ class. 

Monday, July 2, 2012

Mason Jars 'n Lights

my next project was in the hopes to create a fun and inexpensive centerpiece for an upcoming event.  i had seen all these neat parties and wedding table settings using mason jars. i decided to jump on the band wagon and try it out myself. the first thing i did was head to our local flea market. it's only once a month but it's fantastic! i found these six jars. the light blues ones are the toughest to find, they were produced before 1937. it is even more difficult to find the zinc lids. i was able to bargain and get the two large one for $2.00 a piece. some vendors had them at around $20-$25.00. 

after washing each jar out, i had went down to my local craft store and bought some pearlizing spray paint and silver glitter spray paint. i also bough an inexpensive jar to test the paints. using the paints outside, i did three types of spray tests. i did one where i painted layer upon layer of pearl paint to create an opaque finish. i did another where i did around two layers and the last i did about 5 layers of glitter spray paint. the pearl paint was easier to use and dried a lot quicker....the glitter paint took a while to dry and liked to drip all over the place. i even decided to spray the metal rims of the lids, again the pearl was easier to work with over the glitter. 

i had originally planned to just use the jars as vases for flowers, but i found some flame less tea lights and decided to use a few of those. they turned out fabulously. i've decided to mix the jars as vases, tea light holders and photo holders. i'll post some pictures after the event to show you guys the final outcome of my centerpiece. i will not be painting the older jars, in particular the blue ones. they are too pretty without it and since they are so rare, i'm going to preserve them in their original condition. i did find one mason jar from canada from 1959, which was gorgeous. i will not be painting this one either. i'll post more pictures as my days of planning progress.

Sunday, July 1, 2012

Fun in the Sun- Flip Flop Invitations

for this project, i was hired to create an invitation that would include mailing the invitation in /on a pair of flip flops. it was for a double birthday party for two little girls turning 8! i had three different size flip flops, in four different designs. instead of just attaching a square card to the flops...i ended up drawing the foot myself and the toenails. using my design program, i colored the nail polish and foot to match the colors of the flip flops. after cutting out each invitation, i punched a hole between the toes and wrapped it around the thong portion of the flip flop. i tied the flip flops together with two different colors of grosgrain ribbon. i bagged them up by size and sent them on their way to be packaged and shipped. the whole project took about 4 days. the flip flops were order in bulk, about 75 pairs. each guest ended up with a pair of flip flops to bring to the pool party and an extra little favor before they arrived. 


High Heels and Wine!

as a gift for my friend, who had a birthday...an acceptance into flight controller school and who always hosts wonderful little get togethers...I decided to get here a little something that would represent the fabulousness that she encompasses. i found this extra large high heel shoe which was a wine bottle holder. it was a sparkly, red stiletto peep toe...is there anything better?! i then found a fun summer wine, with bottle colors that matched the heel. i held it all together with a large white satin bow. 


Sunday, June 17, 2012

Britain is the Best!

in celebration of the fun events england has been and will be holding this summer (the diamond jubliee and olympics), i used this countries flag and heritage as inspiration for an invitation for a girl's weekend. i used a distressed union jack flag as a back around, placing a die-cut text box on top to fit my information. i then added a vintage crown, with a sparkly gem to add a little flare to the invitation. i went through many drafts, since i couldn't pick a font or color scheme to save my life. i made the invitation the center of a red folder, adding a direction card and information card to the bottom pocket to complete the look. the fonts i used were: castellar and chopin script

Monday, May 21, 2012

Graduation from GW

this was my favorite gift to wrap up. this was the first idea that came to me. the tag reads 'hail a taxi, a spade marks the spot'. the graduate loves kate spade. so all wrapped up in  yellow wrap with black and white checkered ribbon was a kate spade pouch, the print of which is a map of new york city with a spade marking the location of the flag ship store. 
for this particular gift, the graduate was graduating from george washington and will be attending n.y.u in the fall, so i tried keep with the theme of new york city. i bought separate gifts, wrapping each gift differently, each reflecting the graduates personality and future plans. 

as an art historian i have to promote a trip to one of the greatest museums in the world. i had a map and information pack on the museum, which i added to a picture from the kate spade collection.

this gift wrap slightly hinted at the gift inside, the only clues being the vintage , sparkle pin and address.  the gift was 'breakfast at tiffany's', a must-see before a trip to new york. 

i found this amazing vintage new york city wrap which had a vintage image of n.y.u. which worked out fabulously for this gift. you'll notice i have made tags for each gift. this one in particular is a white embossed 'congratulations', which i stamped on a navy card. 

finally, i wrapped the gift in kraft paper, topping it off with a navy ribbon with white polka dots. the school  colors were navy and buff, however knowing all the gifts in side were quite vibrant and detailed, i kept the outside quite simple. i made the tag using the school mascot, mounting it on silver and white card stock. with a congratulation message on the back.